
Magento is one of the most popular eCommerce platforms empowering thousands of websites over the Web. In this tutorial, we will introduce the very first step of setting up a Magento Online Store. We will guide you step-by-step on how to install the Magento software via Softaculous auto-installer.
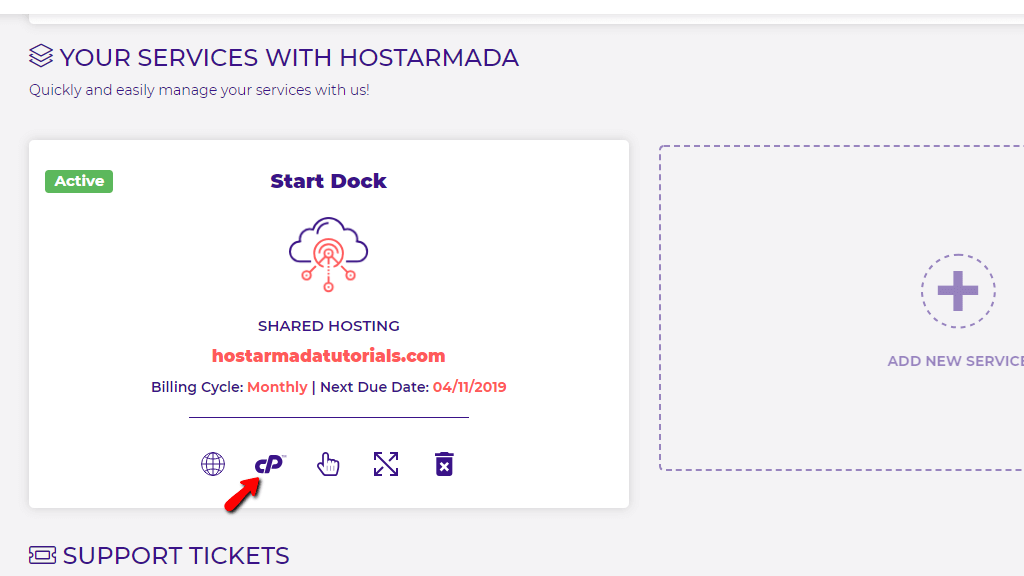
The first step we will need you to take is to log in to your cPanel account. You can do that by clicking on the purple “cP” button available under the Home Page of your Client Area with HostArmada.
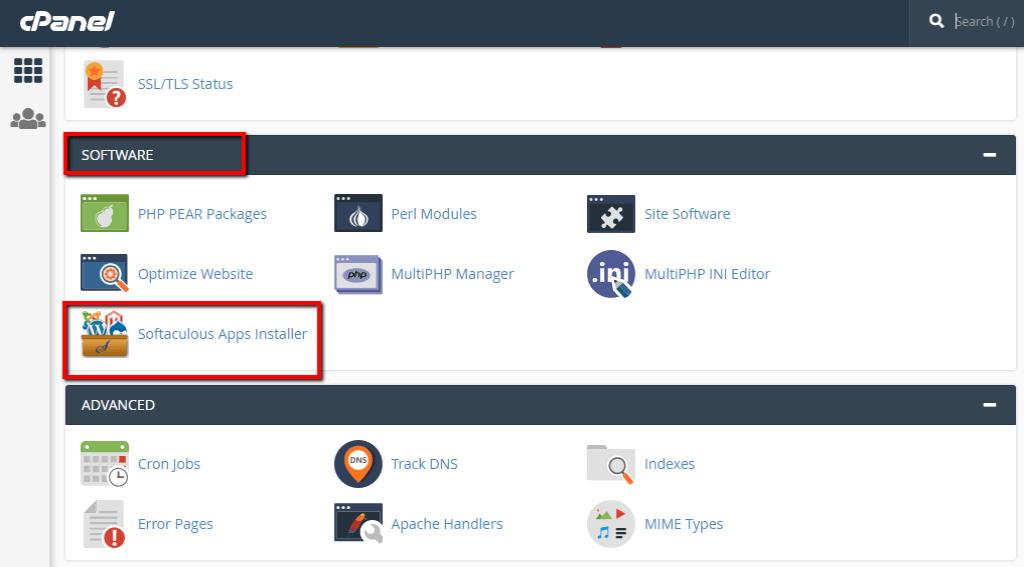
After you log in to your cPanel account, please navigate to the “Software” directory where you will locate “Softaculous Apps Installer”.
Please click on the icon and you will be presented with a new page. You will be able to locate the “Magento” software by typing “Magento” within the search bar available at the top left corner.
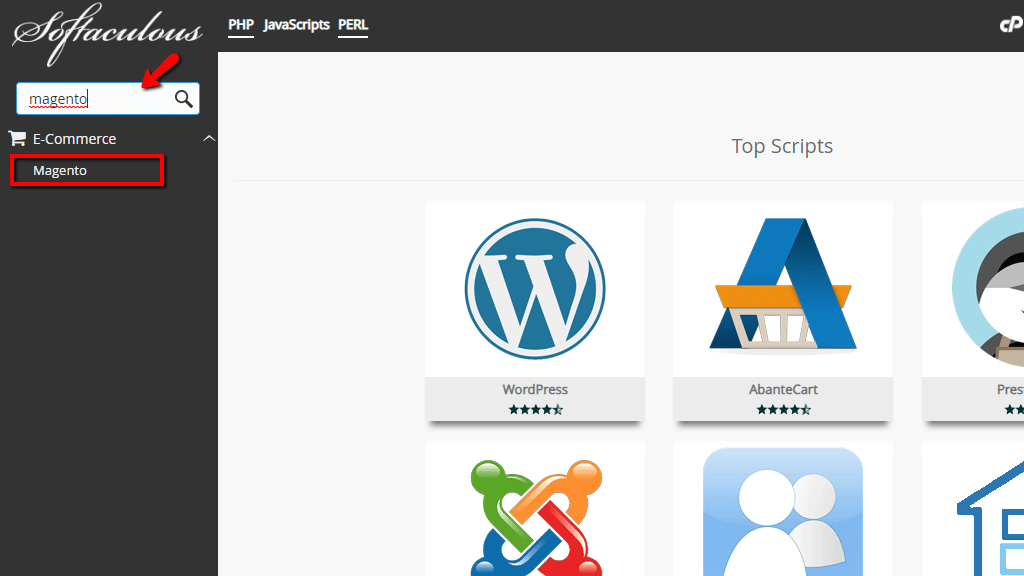
Please, click on “Magento” from the search results lists and you will be presented with the Installation page.
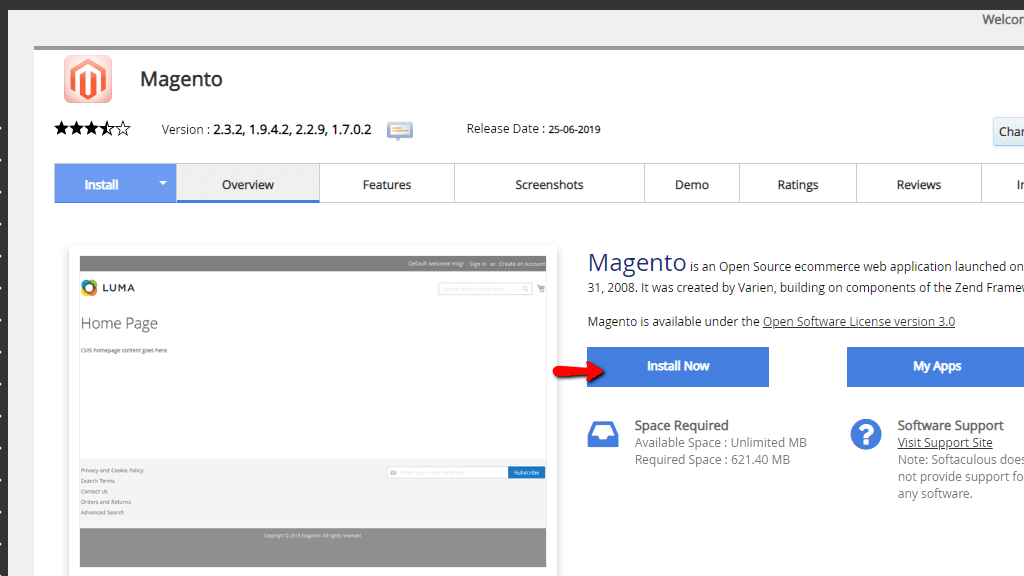
Now, that you are on the Installation page, please click on the blue “Install Now” button and you will be presented with a new page where you will have to specify the configuration details for the installation.
Now, let’s review what information you are required to specify. We will start with the “Software setup” section and review each of the fields separately.
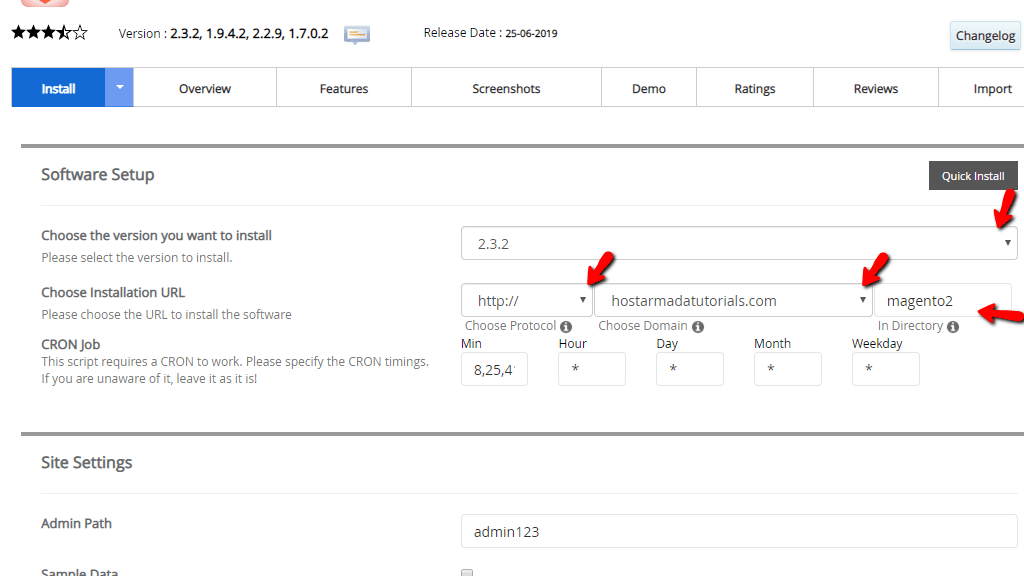
From the first “Choose the version you want to install” dropdown menu you will have to select the version of Magneto which will be installed. We strongly recommend you to choose the latest available version unless you strickly require another version.
The second “Choose installation URL” option is split into three fields. From the first “Choose Protocol” dropdown menu you will need to determine the protocol of the installation. Please note that in order for the HTTPS protocol to function properly it requires a valid SSL certificate installed on your domain name. From the second “Choose Domain” field you will have to select the domain name on which you would like the installation to be performed. From the third “In Directory” field you can specify the directory under which the installation to be performed. If you would like the installation to be performed directly under the domain name’s root folder ( i.e. https://yourdomain.com), please make sure to leave this field blank. Alternatively, if you wish to have Magento installed under a subdirectory (i.e. https://yourdomain.com/onlinestore), please make sure to specify the subdirectory under this field.
From the last “CRON job” option you can determine the timing for the CRON jobs of your Magento software.
Under the following “Site Settings” section you will have only two fields.
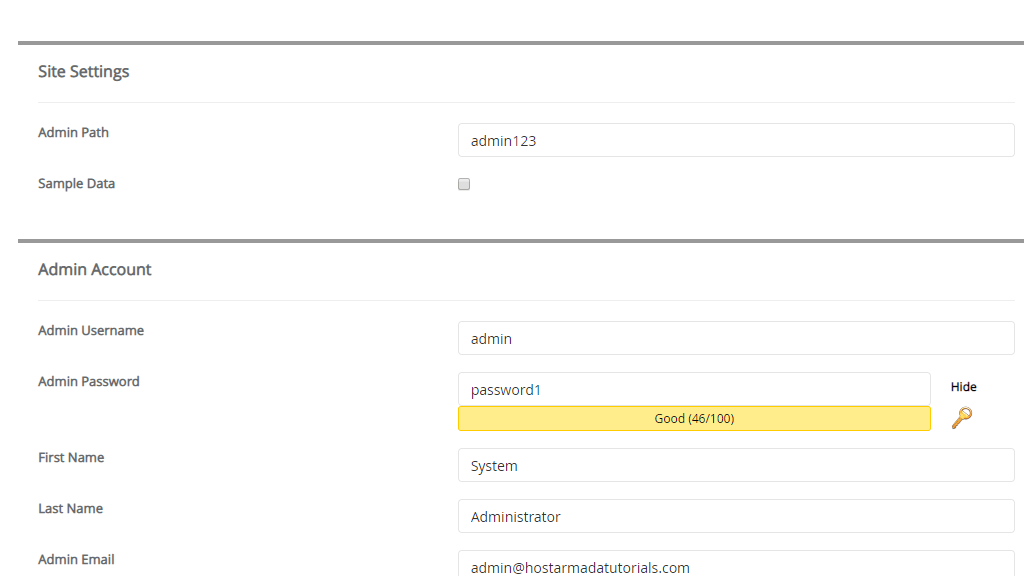
The first “Admin Path” field determines the subdirectory of your Magento Admin files and Admin access URL (i.e. https://yourdomain.com/admin123).
If you wish sample data to be imported during the installation, please make sure to tick the checkbox next to “Sample Data”. Alternatively, leave it as it is.
From the following “Admin Account” section you will need to specify the administrative details of your Magento websites.
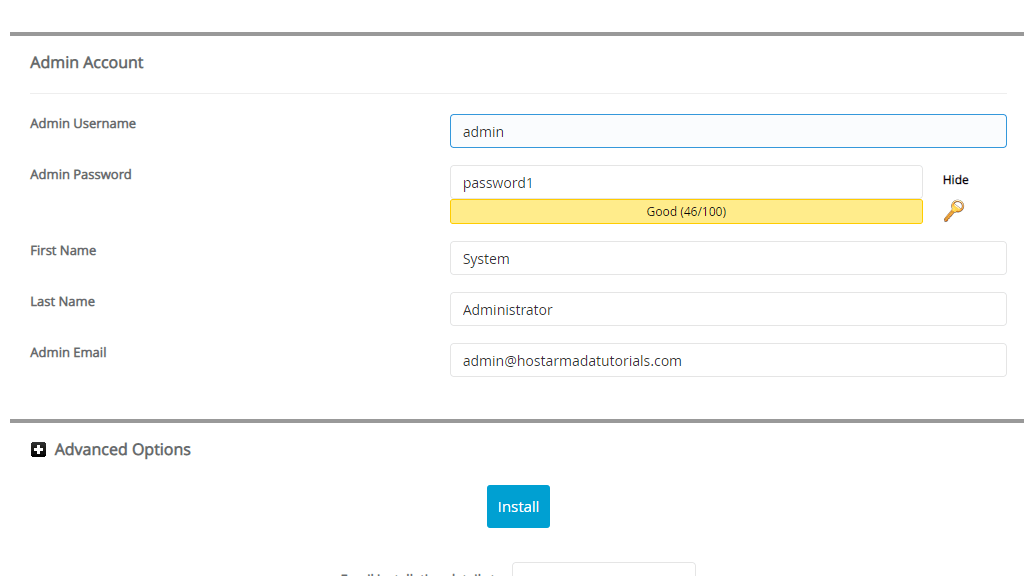
Please make sure to change the default username and select a strong password as using insecure login credentials may reflect on your website security and make it vulnerable.
Finally, if you expand the last “Advanced Options” section by clicking on the black “+” icon you will see some additional options.
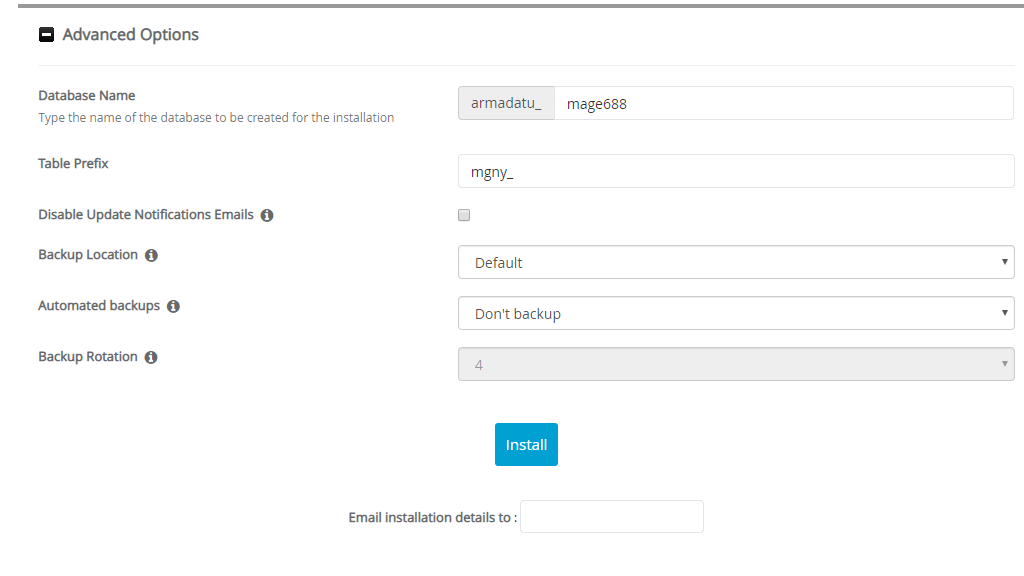
You can give your database a custom “Database Name” and change the database “Table Prefix”. You can disable the update notifications sent via email by ticking the checkbox. You can control the “Backup Location”, the frequency of the Softaculous “Automated Backups” and the “Backup Rotation”. Please note that these backups will be stored under your hosting account and they will demand available free space. If you are using one of our shared hosting solutions HostArmada is already backing up your data and storing it on remote servers for enhanced security.
If you are ready, please click on the blue “Install” button. After the installation is initiated, please allow it a few moments to be completed. Once completed, you will be prompt with a new message stating the installation is successfully completed and you will be provided with direct links to your new store and to your Magento Admin login page.
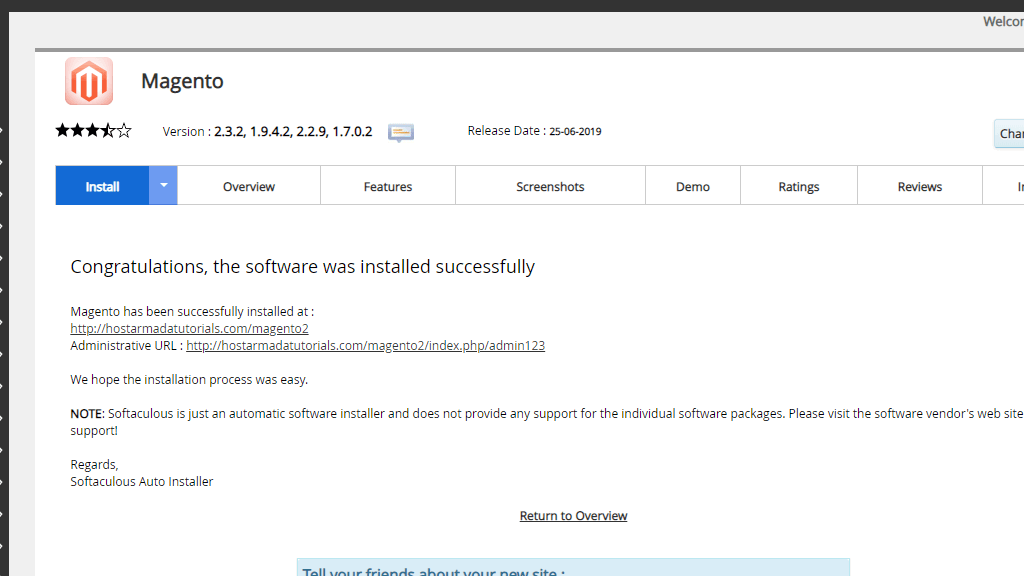
You are all set now - Installing Magento via Softaculous is as simple as that. Congratulations on installing the Magento software on your new Online Store. We hope everything ran smoothly and we would like to welcome you to contact us in case you experienced any difficulties or you ended up with any error messages.

Sebahat is a young and bright woman who has become an invaluable part of our team. She started as a Customer Care Representative, mastering that role and, along the way, growing into a tech-savvy individual who is well acquainted with every support layer of the company. Driven by her aim to improve our customers’ experience constantly, she is committed to enhancing the extraordinary support we deliver.
Learn more about Magento 2 in the other tutorials that we have:
