
Let’s begin with an example that will help clear up exactly what that is!
You are a new customer of HostArmada and have only just done the next step to making your online project a reality, choosing a domain name after settling on one of our hosting plans. These initial steps are all too necessary for getting your website online so that people can visit it through their browsers. The result is often referred to as a ‘live’ or ‘public’ site.
Shortly afterward, you have decided that your online project would be built via WordPress. Either with assistance from our dedicated support team or by yourself, you’ve installed and set up WordPress for your domain name and have already begun working on it. Congratulations! However, maintaining a WordPress website is a never-ending process. Even after you’ve built your site, laid the groundwork, and started to attract visitors, you will still likely continue to update and make adjustments indefinitely as your project keeps on growing. For this specific reason, this means you will need to find a way to test those changes without negatively impacting your website or its visitors.
That is the exact moment that website staging comes into play!
A staging environment or (staging site) is essentially a clone of your website, independent of your live site that visitors can see. It has the same settings, same software, and same hardware as your live site but is safely placed in a separate area while you work on it. This is why a staging site is similar in many ways to a live site, but its purpose is very different. Staging sites are private — not intended for just anyone to visit. They’re used as an excellent tool for experimenting and testing. For that reason, they’re also frequently called ‘testing’ or ‘development’ sites.
Website staging is a crucial feature in any exceptional hosting package because it allows you to make changes to your website without interrupting your live site. This means no downtime while making changes, so you can keep on engaging your readers and or selling products. This also means you won’t take a hit on your SEO ranking because search engines won’t be indexing the staging copy of your site.
Here are some other scenarios where having a staging website would be incredibly beneficial to your online project:
Now, of course, all of this can easily be done on your live website. That being said, it is nothing short of a risky proposition. Because if you try out a new plugin or test a bug fix on your public site, you risk breaking something in the process. You could also end up slowing down your website temporarily, causing downtime, or otherwise interfering with your visitors’ experience. And don’t get us started on the issues you would face if you wanted to redesign the live site from scratch without a staging website!
Around this point, you are likely wondering whether or not we offer this option with our assortment of web hosting plans... And we are happy to confirm that HostArmada does indeed provide this option, and our support team will always be here to assist you with this process should you encounter any issues along the way!
While there are various ways to set up a staging environment manually and equally manage it the same way, in this tutorial, we will be talking about one of the easy to use and automatic staging features offered by the Softaculous Apps Installer, already present in the cPanel provided by HostArmada with the purchase of a hosting plan by default!
Before we get into the step by step guide on how to use this feature, it is important to list a few things for reference that are important to keep in mind:
Staging functionality is available only for a few applications, and the developers of Softaculous are looking to add more.
If your site were installed manually instead of through Softaculous, you would have to import it to Softaculous first.
The application we will use as an example will be based on WordPress, and this tutorial already assumes that the installation of WordPress has been done through Softaculous. Should you wish to install WordPress, we have another tutorial that can be of assistance for that! You can find that one by clicking here.
Step 1. First, access the cPanel service for your web hosting account through the browser or your client area.
You may take a look at this tutorial in case you are having any issues with accessing the cPanel service.
Step 2. In the cPanel search field, type down “Softaculous Apps Installer.” and click on the feature that will appear.
Step 3. Inside Softaculous Apps Installer, navigate to “Installations” and click on it.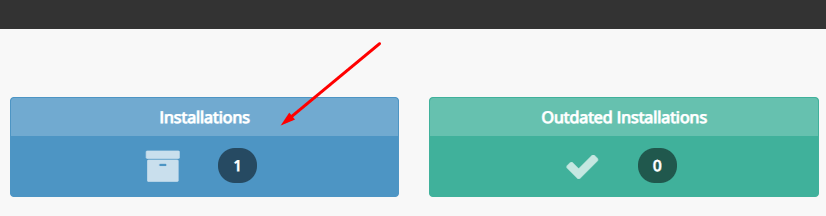
Step 4. Locate your WordPress installation and find the “Stage” button to its right. The Staging page will appear with the current installation details and a form to fill in the stage installation details.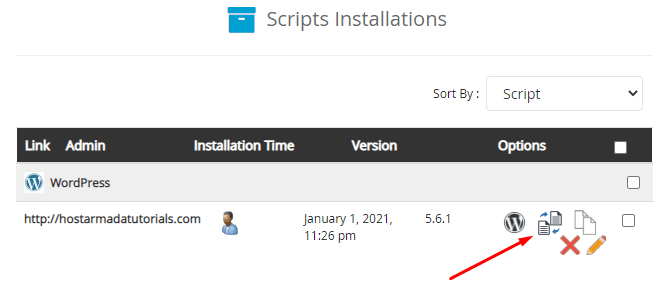
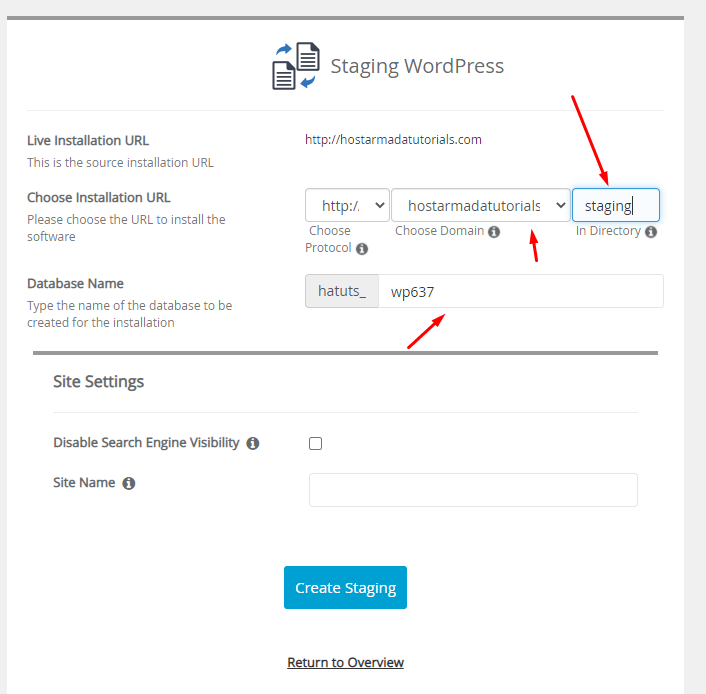
Step 5. A new form will appear to fill in the staging installation details, which we’ll break down for your convenience here:
Step 6. Click on the “Create Staging” button, and that should do the trick. The time taken may vary in accordance with the size of your installation, so please be patient.
There you have it! You have successfully managed to create a WordPress staging environment for your website.

Daniel, our Content Manager, joined HostArmada with over five years of experience under his belt in the web hosting sector in various roles, including customer care, sales, and technical support. His passion for writing and communications and his experience makes him the ideal person for the job. He is devoted to spreading wisdom and knowledge about the web hosting sector so that both clients and colleagues can benefit greatly. In his words, serving and educating others is the way to mutual prosperity.
Learn more about cPanel in the other tutorials that we have:
